Monday, 14 December 2015

Practical: contouring the face

Products used:

  • Illamasqua matte primer
  • Kryolan foundation pallet
  • Kryolan dermacolour concealer pallet
  • Illamasqua loose white powder
  • Kryolan blusher pallet
  • Illamasqua sculpting powder - lumos and heliopolis
  • Illamasqua contour pallet
Brushes used:
  • Foundation brush
  • Kabuki brush
  • Small round tip brush
  • Blusher brush
  • Highlighter brush
  • Triangle powder puff

Method

To start off, I did my usual preparation which included tying my own hair back and washing my hands and setting up my area. I then went on to prepare my models skin using cleanser, toner and moisturiser. From here, I applied a standard base to match her skin colour.

The general rule of contouring is as follows:
  • Highlight and shade should be 1-2 shades lighter or darker than skin tone.
  • Highlight parts of the face that stick out
  • Shade parts of the face that suck in
Highlights are usually applied under the eyes on top of the cheekbones, jawline, the brow bone just below the brow, nose and forehead if it is needed. To shade, the best way to make sure the right part is being done it to feel the bone structure with your fingers. This allows you to feel the outline of the cheekbones so you are able to gently apply a shade just below them.
When applying shade, ask your model to suck in their cheeks and slightly curve the product round from the ear towards the mouth being careful not to take it too far. Shade can also be applied to the sides of the head, side of nose, chin and jaw.


As you can see, I did the contour very subtly as I wanted it to look natural. You can see the definition in the cheek bones, jaw and nose. I also think it brings a bit of colour and life to the face once it has been contoured. If I wanted the contour to be stronger, I can gradually build up the product to make it stronger.

I then went on to add a very subtle amount of blusher to the cheeks. Scraping the chosen colour (TO) on to a pallet, dip the blusher brush into it and test on the back of hand to make sure the colour is right and doesn't come off too strong. Gently apply to the cheeks to finish. 

Monochromatic Makeup on Partner

Following on from out colour theory sessions, we are asked to create one of our chosen face charts on a partner. So this was my chosen face chart.

I then went on to create a real life version of my chart. I started off by creating a pale base using illamasqua skin base. I wasn't sure what to do with the eyebrows so I left them naturally. I then went on to do the contour, eyes and lips.


I am actually really suprised at myself for being able to transfer my design on a chart in to a real life creation. I really like how it looks very close to my design on paper. If I was to change anything I would like to try bleaching out the eyebrows and maybe also trying something with the eyelashes.


Monochromatic Face Chart


Analogous Face Chart


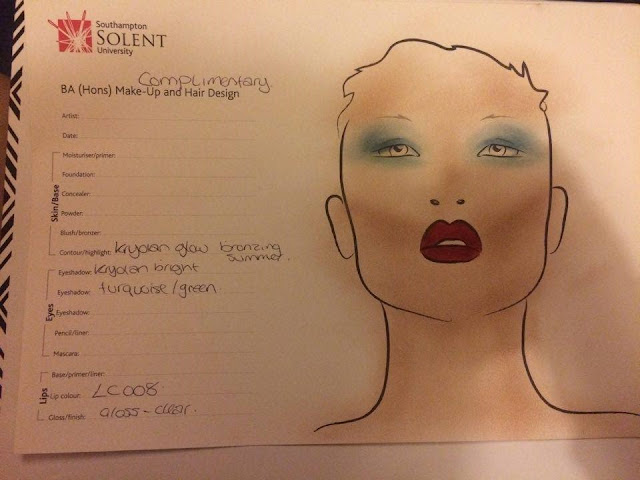
Complimentary Face Chart


Reflection: Portraiture and Symbolism

During the Renaissance period, Queen Elizabeth's portraiture started to become more propaganda using new techniques to show sophistication. Portraits had specific items in them for different reasons. It is known that symbolism was used to translate to the majority of people who could not read and therefore looked at the items in the portraits to translate it. Here are just a few examples of what I have found.

The Rainbow Portrait c1600

In this portrait, one of the first things we notice is the rainbow in her hand. This suggests peace which also leads on to the motto, 'non sine sol iris' (no rainbow without the sun). We see on the garments she is wearing that there are pictures of eyes and ears which could mean that she is going to watch over and listen to her people.


Pelican Portrait c.1575

At the top left corner you can see the Tudor rose which is seen quite often throughout portraits of the Queen. This is linked to the family and the Tudor dynasty. We also see the bright colours she is wearing in the portrait which shows she is wealthy and has power.

The Ermine Portrait c.1585 


This is one of my favourite portraits of the Queen as I feel like it comes across really strong and powerful. The use of black coloured clothing signifies her seriousness in which she takes her role. There is also a sword at the bottom right which could show a gentle warning to anyone wishing to go against her. At the same time, judging by the way she is sat, I would see it as a way of saying that the Queen would like to rule peacefully. The most notable part of this portrait is the ermine seen on the Queen's left arm. The ermine is a known status symbol as it was only royalty or high nobility that were to wear it. According to legend, the ermine itself would rather die than to ruin its own pure white coat and this is why the animal became such a prized possession. The untouched fur coat was another reason why the ermine became a sign of purity.


Today's lesson we learned about portraiture and symbolism. I managed to learn quite a bit from this lesson, including what certain items in portraits actually meant. I also learnt that Queen Elizabeth suffered from bad skin and had very decayed teeth. She also developed alopecia and wore wigs quite often. I felt like there was a lot to take in this session and I wasn't sure how I was going to remember it all. I did enjoy finding out about the different symbolisms in the portraits however at the start of the lecture I actually felt a bit pressurised as if I should already know everything about them. My next step is to look into some images from more recent times to see if I can spot any symbolism that still exists.


Source:

https://en.wikipedia.org/wiki/Portraiture_of_Elizabeth_I_of_England

http://www.rmg.co.uk/discover/explore/symbolism-portraits-elizabeth-i

Practical: applying a base, round 2


I am much happier with my application this time around as I feel it matches her skin colour better. The only thing I would do differently is powder the eyes better as you can see where the product has built up in the creases.